Shop Notes

Starting the Trestle Table

I’ve been meaning to build a new dining room table for our house since we moved in last year. A quick look at my /Now/ page showed that I bought the lumber for the base back in May. (It also shows I should probably update the /Now/ page.) It had been roughed out and stickered in the basement since then. Back in July, I made a trip out to Keim Lumber in Ohio and bought 5/4 cherry boards for the top. With Thanksgiving fast approaching, and plans to host at our house, I really need to buckle down and get this table done.

The mortises in the feet were cut pre-glue up using a dado stack on the table saw.

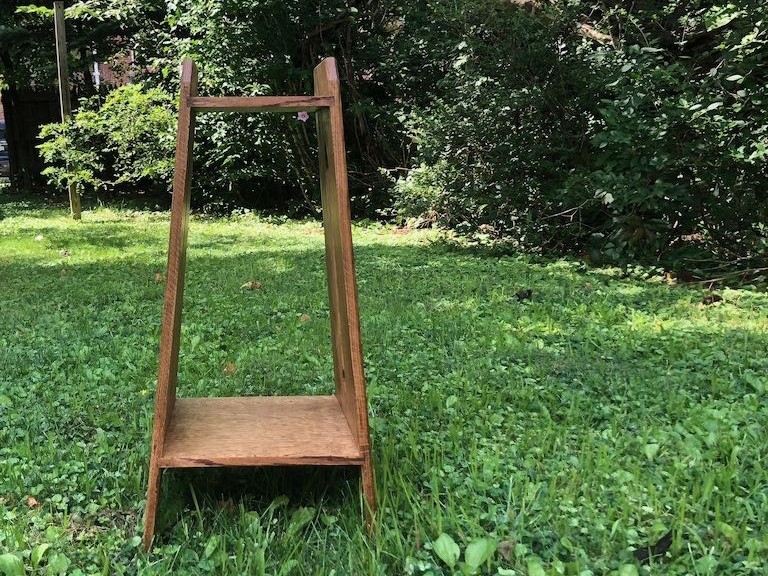
The plan for the table is based on a design published by Chris Schwarz* in Woodworking Magazine. The base of the table is made from yellow pine. The top will be made from cherry. After deciding that it had acclimated long enough, I started the process of milling it down on Friday, Sept 27, giving all of the boards a pass on the jointer until flat and then a light pass through the planer. They were then left to sit until Sunday the 29th.  The legs, braces, and feet were then milled to final thickness, and the mortises were cut in the feet using a dado stack on the table saw. These boards were then glued up.  The same procedure was done for the legs. The braces did not require any dados at this point.

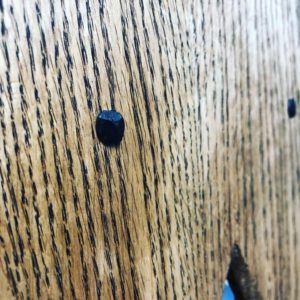
As of yesterday, I had cut tenons on both legs and fit them to feet. I tried this by hand on the first leg with not horrendous, but unacceptable, results. The leg ended up snug but significantly twisted in the mortise. This was remedied by moving the operation to the table saw. I squared the tenon up using the dado stack and then glued on pieces to replace the previously cut away wood. This sat clamped overnight and I re-cut the tenon faces using the table saw again today.

A tenon at the bottom of the leg fits into the mortise in the foot. The brace is joined with a bridle joint.

In the meantime, the tenon was cut on the second leg via the table saw. I also took the opportunity to cut the bridle joint in the top of each leg using the band saw and a chisel, as well as cutting the mating piece in the braces using the table saw and dado stack.

By using the table saw, I got piston-fit joinery without too much hassle. At some point an upgrade of the table saw is on my list, if I think that the shop can stand losing the space to it. I’ve been working on a Ridgid R4513 jobsite saw for the past few years. I find that the accuracy of the saw, including blade tilt and height as well as fence accuracy just aren’t a great quality. That said, the saw folds down to save space, and in a 9 1/2′ x 18′ space, every inch that I can save helps.

Now on to shaping the feet and braces, and cutting the tenons on the stretcher.

* I have built a number of pieces that Schwarz has written about/researched/designed/built. I think this is a function of a few things. First, he is a prolific publisher. Seriously, the mere volume of written word on woodworking that he has put out there means that you are likely to find some piece interesting that you’d want to build or technique that you want to try. Second, the writing is amazingly accessible. He’s concise, but descriptive, easy to read, and amusing. Finally, the styles and techniques that he writes about are what grab my attention. Let’s face it, everyone has different tastes things, be it furniture, music, art, clothing, etc. In terms of furniture, I’ve now read, and own, three of his books (Campaign Furniture, The Anarchist’s Design Book, and Workbenches). I reference these books constantly in the shop and have found the styles of furniture that he gravitates toward to be the same style that interests me.

A Fair in the Park (or Kalimba Madness with Turners Anonymous)

The weekend of September 6th, 7th, and 8th brought the annual Fair in the Park in Pittsburgh. For anyone unfamiliar with this event, it’s a three day arts fair put on by the Craftsmen’s Guild of Pittsburgh. The event features artists working in ceramics, fiber, glass, metal, jewelry, leather, and wood. Every year, the western Pennsylvania chapter of the American Association of Woodturners, Turners Anonymous, has a booth, not to sell, but to show work from members and demonstrate.

With Fridays free from the 9-5 job, I signed up to spend the day in the booth talking to folks and demonstrating. There were lots of wonderful folks that stopped by to talk art and woodworking, watch shavings fly on the lathe, and look at the works on display. I also had the chance to browse the wonderful artist booths throughout the park.

In preparation for the event, I wanted to put together a few example pieces to show what I would be demonstrating. I considered small items like pens and stoppers, as well as candle sticks/holders, bowls, and boxes. However, I decided that I wanted to try my hand at a musical instrument.

I remembered an old episode of the Woodwright’s Shop from the 1980’s where Roy looked at different traditional African instruments. One of the instruments, a mbira or kalimba, could be as simple as a board with metal or wooden tines set to be able to vibrate. Adding a resonating chamber to the board helped amplify the sound. So, if a box is all that was needed, why not a turned box? I obtained a tines and bridge hardware and set about trying to figure out the size for the turning.

Kalimba #1 was made out of cherry and ended up a bit small. Additionally, the kit that I had obtained contained one inch screws, suggesting a need for a rather thick sound board. This first box was made with that in mind. The result is a much smaller resonating chamber and a quieter instrument.

Ruby the Cat posing with Kalimba #2

Kalimba #2 was made from Hormigo (also called Orange Agate, Macacauba, or Macawood), a central american hardwood. I’ve worked with this wood several times before and find it to be easy to turn. It also accepts a very nice finish. The sound board was made significantly thinner. Due to the initial size of the blank, I was left with a relatively small instrument that could only accept nine keys. It has a very nice sound and handles very well.

On the first day of Fair in the Park, I had an opportuntiy to demonstrate the making of the instrument. The process is fairly straight forward for anyone that has turned a lidded box before. After placing a bowl blank between centers, I turned down the blank, shaping the outside of the bowl and adding a tenon to the foot to allow the bowl to be placed into a four-jaw chuck. Once the outside was turned and sanded, the bowl is reversed placed into the chuck. The top of the blank is then flattened, taking care to remove any piercing from the spur center. Once the top is flattened, a lip is turned into the top where it will be fitted to the bowl. After the lip is established, the top is parted off. The cherry blank used for Kalimba #3 was larger than #1 or #2 and I did not have my handsaw with me. This made parting off a bit of a chore.

After the top is parted off, the next step is to start hollowing the bowl, taking care to establish the side walls so that the top will fit snuggly. Once the walls are established, the rest of the bowl can be hollowed out and sanded. Finish, if desired, should be applied to the inside of the bowl at this point.

Once the bowl is finished, the top inside lip of the top is coated with an epoxy and fitted to the bowl. After giving the epoxy time to set, I then cleaned up the transition between the bowl and the lid. The lid is then flattened, the sound hole drilled, and pilot holes for the screws for the grounding bar are also drilled at this point. The entire bowl can then be removed, flipped around, and placed in cole jaws to remove the tenon and clean up the bottom. Final finishing can then be applied. After the finish is cured, the grounding bar, bridge, and tines can be added, and the instrument given its first tuning.

17 Key Cherry Kalimba

Kalimba #3 was made from cherry. The top was made significantly thinner and the bowl much thinner, resulting in a larger resonating chamber. The sound quality remained clear with the ability to amplify sound much better.

17-Key Sapele Kalimba

Kalimba #4 was made from sapele. The initial process for this was the same as the prior three instruments. However, I wanted to obtain a perfect grain match. The sound boards for kalimbas #1-3 were each made by flattening the top of the intact bowl, creating a lip on the outside of the bowl, and then parting off the top. The top was then flipped over and placed into the hollowed bowl. This resulted in an inability to get a perfect grain match.

Arts and Crafts Plant Stand

This project started based on a request for a small stand to hold a vase. I initially started to consider building a small Shaker-style side table. However, I had a few pieces of red oak in my lumber rack which were calling out to build something in the Arts and Crafts style.

The Design

Straight vs. Splayed Sides in SketchUp

The plan for the stand involved sides would taper in width from bottom top. I had initially considered using straight sides with tapers. However, working with SketchUp allowed me to play with adding splay to the sides that both sloped inward toward and tapered in width from bottom to top. The sides would have arrow-point piercings and arches to define feet.

Build Process

The piece as fairly straight forward to build, with the only “trick” being to save tapering the sides until last. Oak panels were glued up to reach the maximum width on the bottom of 13 inches and length of 28 inches. The sides ended up 5/8″ thick. Two shelves were glued up, with the bottom shelf measuring about 12 1/4″ wide and 13″ long, and the top measuring 9 3/8″ wide by 10″ long. These were 1/2″ thick.

Once the sides were glued up, flattened, and squared, I set the table saw to a 5º bevel and beveled the top and bottom edge of each side to match the intended 5º splay of the legs. I then swapped out my combo blade for a 1/2″ dado stack, leaving the 5º bevel setting intact. Dados were then cut into the sides for both the top and bottom shelves on each side.

Quartersawn Red Oak Shelves held in place with dados and rosehead nails.

After the dados were cut, the combo blade was swapped back into the saw, leaving the 5º bevel. I then began the process of trimming the ends of each self to the proper length. The bottom shelf was trimmed first, maintaining a length as close to 13 inches as possible. One end of the top shelf was then beveled. The stand was partially assembled with the bottom shelf in place. The top shelf was then aligned (but not inserted as it was still too long), and the unbeveled end was marked to find the final length. This was a tedious process and I’m considering a better way to do this going forward.

Before tapering the sides of the stand, I turned my attention to the arrow point piercings. These piercings involved up and down arrow points connected with a 1/2″ channel. I started by creating a template of the arrow point shape. The template was then used to draw the arrow points in both top and bottom locations, centered on the 1/2″ channel. With a Forstner bit, I removed the bulk of the waste in each point. I then pulled out a router with fence and spiral upcut bit installed. Setting the fence on the router to dead center of the sides, I then routed out the channels in each side. I returned to the arrows with chisels, cutting to the lines and defining the full arrow. Then, with a chamfer bit installed in the router, I routed around the piercing. This was finished with a chisel and knife to reestablish the points at the very top of each arrowhead, leaving the sides rounded.

After the piercings were complete, each side was then tapered 5º from bottom to top using the band saw, cleaning up the marks with a jointer plane. I then measured and marked in from the top corner 3/4″. Using a bevel gauge set to match the angle of the arrow points, I marked a line and cut the final bevels. the outside edges of both sides where then chamfered with the router.

Wrought rosehead nails to add decoration and strength to the shelves.

The piece was then dry fit to allow for marking each shelf’s final depth. These were then ripped down on the table saw and cleaned up with hand planes to match the taper of the sides. The stand was glued up and finished using a wash coat of shellac, followed by a dark walnut stain, and topped with black paste wax. Wrought rosehead nails were then put through the sides into each shelf.

Thoughts for the Next Batch

There were a few mistakes along the way in execution of the design. First, I would prefer to make the next round entirely out of quartersawn stock. I had only enough quartersawn oak for the shelves. The sides were glued up out of the remaining stock which was mostly flat sawn. I didn’t notice until the piece was in the finishing stage, but I should have flipped one of the sides to align the flat sawn pieces. The panel glue up was also somewhat glue starved, as I found when inserting tight shelves. It resulted in a partial glue joint failure. This was remedied by wicking in some hide glue, but I’d rather not have to deal with this mid-build.

Second, if making the piece again, I’d likely make a full template of the sides and piercings to allow for template routing. Roughing out tapers on the band saw and cleaning it all up with a flush trim bit would save significant time over repeated resetting of the table saw, particularly given the jobsite saw that I work with.

Finally, I’d need to consider a better method to size and trim the shelves. What that method is I’m not yet sure.

On the way to its new home.

Boarded Bookcase

Just a brief update. I have a number of projects in the works, including a new dining room table, a pair of Roorkhee chairs, a side table, and some boxes. Add to that some updates in the workshop, including adding electricity, installing my mobile cabinets in a more permanent position, and adding a lumber rack, and it’s been a busy few months.

I completed this bookcase a few months ago. Like the earlier bookcase that I posted, this is based on the Boarded Bookcase design from Chris Schwarz’ The Anarchist’s Design Book. However, I added a top to the case. The exterior was finished with Federal Blue milk paint (one of my favorite colors from the Old Fashioned Milk Paint Company) and shellac. The interior used garnet shellac and wax.

Boarded Bookcase with Top

2018 Year in Review

This has been a busy year. I was able to complete some large and small projects, but the process of buying a house got in the way of doing production work to prepare merchandise for a proper booth and show. So what did I get to accomplish during the past year?

New Workbench

Most of the early part of the year was spent planning and building a proper workbench. I documented this build extensively. The bench has been a solid and wonderful work surface and clamping device. I’ve got a quite a list of pending projects to put it to use on.

Turnings

This past year involved experimenting with painted bowls and my first segmented piece. I’ve also added a bed extension to the lathe and look forward to doing some chair work in the next year.

Outdoor Building

During the summer I had the opportunity to do some outdoor building in the form of a trellis structure. The build was straight forward and the finished project provided some much needed backyard screening for the client. It also gave me a chance to improve my Sketchup skills.

Work On Display

The Pittsburgh International Airport has a series of display cases that hold artwork on the land-side of airport. Beginning at start of December, the airport put a large number of turnings from members of Turners Anonymous, the local woodturners guild on display. I have several pieces on display, including a painted vessel and bowl. I’ve been playing with these forms and finishes as part of my preparation for a formal show. While I wasn’t able to produce much this year due to a variety of family, work, and other circumstances, I’ve been happy with the designs and can’t wait to make some more for next year.

If you are out at the airport before February be sure to check out the cases to see not only my work, but the work of numerous area wood turners.

Plans for 2019

I sat down and put together a list of planned projects. The list is currently 15 deep, not counting the general electrical and household work that I need to complete in the next year.

To keep updated, I’ve followed the lead of some fantastic writers and created a /now/ page on the website. Check in occasionally to see what’s next.